Latte Art Swan - Step-by-Step Guide
Welcome to our easy swan latte art tutorial.
Firstly, pouring a perfect swan requires some more advanced latte art skills, but with this step-by-step guide and a bit of practice we’re going to make learning how to do swan latte art a walk in the park.
If you’re reading this blog, hopefully it means you’ve spent a bit of time practicing the more basic designs, and you’re ready to tackle something more advanced. If you haven’t nailed the heart, rosetta and tulip pours yet, we definitely recommend watching those latte art tutorials first and practicing those pours before you try to get the latte art swan happening.
But if you’re ready, let's get stuck in! You can watch the video guide here or keep scrolling if you prefer to read.
Swan Latte Art Video Tutorial
Video Links:
20% Coffee Discount Code: 'latteart'
Swan coffee art is really fun to do and customers go crazy over it. It’s one of those latte art designs in the cup that can be recognised easily because it actually looks like a swan.
So without further ado, let’s jump right into it.
How to Make Swan Latte Art?
If you have wondered “How to pour a latte art swan?”, then this following guide is perfect for you. Mastering the swan will lift your barista game enormously. You’ll not only enjoy the craft, but you’ll also garner a lot of admiration. And one day – if you practice a lot - you might be good enough to participate in latte art competitions.
But let’s get back to basics now and start with the essentials. Shall we?
Combining the Elements
Now, the Swan is a great tester of your latte art skills - as it combines a number of elements we’ve already learnt. This pattern has a rosetta base for the lake the swan is on, another rosetta style wiggle pour to create the wings of the swan, a tulip style bulb pushed in to create the swan’s body, some jug movement to create the neck, and finally a heart to create the Swan’s head.
Note that if you can do these elements individually, it’s just a matter of practice to put them all together.. let’s walk through the steps!
1. Set the Crema

As always, first of all we’re going to set our crema. Now in previous patterns we waited to being 3/4 full before we started our pour. This time around just spend the first half of the cup setting the crema. This will give us more time to pour the pattern, otherwise we might end up with a headless swan!
2. Pouring the Rosetta Base

Once your crema is set, the first step is to pour the lake the Swan is on. Push in the bulb and start your wiggle as if you’re making a rosetta base. Once the rosetta starts to wrap around, stop the pour to complete the lake.
Note! Make sure when you’re doing your lake, you leave a lot of room for the rest of the pattern. The spacing of the pattern is really important to make the final pattern look like a swan.
3. Create the Wings of the Swan

Next up, it’s time to create the wings of the swan. Push another bulb into the lake. If the structure of your pattern starts to fall apart here, you’ve probably either made the lake too high in the cup, or your milk is a little thin causing everything to collapse.
IF you’ve done well, you should be able to push the bulb in, and then wiggle up to the top of the cup to create the wings, in the same way you’d do so to create the second half of a rosetta.
4. Pouring the Swan's Body

For our next step we want to create the body of the swan. With a rosetta, we’d normally cut down the centre of the pattern. However, for a swan, we want to drag down the side of the pattern instead.
Once we’ve done this, hold your jug here an allow a bulb to form for the body
5. Final Step for Swan Latte Art Perfection!
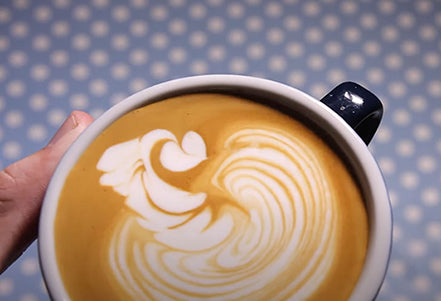
The last thing we need to do is draw in a neck and create the head for a swan. This is done with a little swinging motion, close to the crema so that white is drawn on as we do.
Draw the jug up from the bulb to create the neck, and then push in one final bulb for the head, and pull through. You can either pull straight down or pull through to the side to change the shape of the Swan’s head.
Now this is quite an advanced pour if you’ve just been pouring hearts rosettas and tulips up until now. The first few times you’re going to muddle up the elements and it’s going to feel like you’ll never get it. However, just practice each step one after another, and sooner or later it will feel like you have more than enough time.
More Advanced Swan Latte Art Styles
When you’ve mastered the swan latte art pattern, the world is your Oyster, but there are a few more advanced styles you might be interested to learn once you have the knack of making a basic swan:
Double Swan Latte Art
The next evolution of this pattern is the Double Wing Swan Latte Art. To do this, our first three steps are exactly the same as our first Swan Latte Art Pattern. However, before we add in the Swan's body, we add in a second wing on the other side. This gives the impression that the Swan is about to take flight.
Flying Swan Latte Art
This one is even more Advanced Latte Art, and not for the faint of heart! For this one, we complete the first Swan as normal, making sure there is still room in the cup to pour a second swan! We then invert the cup and pour a second Swan, mimicking the position of the Swan. This pattern is sometimes known as Swan Reflection Latte Art, as the body of the Swan is reflecting in the water.
I actually poured this pattern as my signature pour in the State Latte Art Competitions, way back in 2012!
Important Swan Latte Art Considerations
Whether you want to start with simple swan latte art or the more advanced double swan latte art, perfecting the “art” of making a swan in your coffee cup requires you to pay attention to a few crucial things.
Milk Texture & Temperature
The milk texture is very important, not only for swan latte art, but for latte art in general. If your milk texture is too thin, as I mentioned earlier, all the elements will collapse on each other. If your milk is too thick, you will end up with a really ‘blobby/fat’ swan.
The temperature of your milk is also a key factor in all latte art. Try to heat your milk no hotter than 65°C. Any hotter than this and your milk starts to separate, making it a lot harder to pour.
➜ Learn more on how to texture milk for latte art
Ingredients & Equipment
Milk Types & Brands - Of course we want to make the best tasting AND best looking coffees. For the best latte art results, full cream milk with a high fat content will make it easier to pour great latte art. I love using Bannister Downs milk where I live, but a number of the bigger companies have Premium milks now like Brownes Extra Creamy.
Quality Coffee - The coffee you use is also super important. Some people might be tempted to buy cheaper beans to practice latte art with, but stale coffee is hard to pour with.
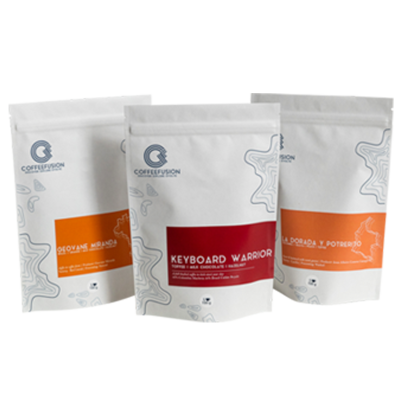
My Blend Keyboard Warrior is great for latte art. It is the most developed roast I have, giving a nice crema which a great base to pour in to. More importantly, with flavours of Toffee, Milk Chocolate and Hazelnut, it tastes awesome with the sweetness of the milk.
Best Milk Jug - A good jug will also help you with your pours. The main problem with cheaper jugs that come with your coffee machine, is that the jug spout doesn't allow for you to pour froth on top of the crema properly. Quality jugs like the Barista Hustle Milk Jug are machined with a lot more accuracy. They are also made and tested with Latte Art in mind.
Coffee Machine - For your coffee machine, it is important that your machine has good steam pressure to help you texture silky milk. The higher steam pressure allows you to get your whirlpool going in your jug when texturing your milk, giving you the velvety milk needed for latte art.
Your espresso extraction also plays an important part in your latte art. Try to avoid using a machine with a pressurised portafilter. The crema will end up being very bubbly, which will make latte art difficult.
Keep Frothing!
We hope you enjoyed this swan latte art tutorial. Now it’s onto you to practice.
If you want to learn more about making better coffee and latte art, we also encourage you to check out our Perth Coffee Courses.
If you’re brave, you can also send pictures or videos to my instagram, @thecoffeefusion, for me to use as examples next week.
Until then… keep frothing’!


Leave a comment
Please note, comments must be approved before they are published